How to add your new email signature
1. Open Gmail.
2. At the top right, click Settings 

3. In all settings, Scroll down to the “Signature” section and then paste your new email signature there. (The “Signature” section is in the “General” tab of Settings.)
Tip: Your image also counts toward the character limit. If you get an error, try to resize the image.
4. If you want your signature to appear only on certain types of messages (such as new messages or replies/forwards), navigate under “Signature defaults” and make your selection.
5. Once you’re happy with your email signature block, scroll down to the bottom of the page and click “Save Changes”.
To see your professional email signature in action, compose a new email. Your email signature should automatically appear at the end of your email.
That’s it! Your new email signature is now added to Google Mail and will be included in any new emails you send.

Add a signature in Outlook
Depending on whether you use Outlook.com, Outlook on the web, the desktop app, or the mobile app, there are different options for inserting a custom email signature into your emails.
Add a signature in Outlook.com
1. From the top right-hand corner of the screen, select the gear icon.
2. Go to “Mail” in menu opened on left side
3. Next, go to ‘Compose and reply’.
4. The Very first section is “Email Signature”. Here click on “+ New Signature”
5. In the Opened text box you can type in your signature and format it however you like.
Your signature should be concise and simple. You can put different things in your signature, like your name, job title, company name, website, and so on. An image or logo can also be part of your signature.
How to add a picture to the email signature in outlook.com
You can add various types of images in signature in outlook, such as:
- Professional Headshot Image
- Image in professional attire
- Your brand logo, etc.
To add an image in signature:
1. Go to ‘View all Outlook settings’ in Outlook
2. Find ‘Email’ and click on ‘Compose & Reply’.
3. Click on the ‘Insert Picture Inline’ button and select the image you want to use as your signature.
4. Adjust the size and position of the image as needed.
5. Select Save when you’re done.
Tip – Use concise images only
How to set up a signature on Outlook for desktop (Windows)
Using Copy and Paste Method
Follow below steps to copy & paste your signature text into the Outlook desktop app:
1. Go to ‘View all Outlook settings’ in Outlook
2. Find ‘Email’ and click on ‘Compose & Reply’.
3. Next, copy your email signature
4. Finally, paste your signature text in the Edit signature box.
IMPORTANT: Outlook desktop employs the Microsoft Word rendering engine for emails, leading to variations in your signature preview.
Expect differences in spacing, font sizing, and image compression.
Additionally, underlines will be added to your links. For recipients, these links may appear with a blue underline, regardless of the color you’ve set.
If achieving “pixel-perfect” email signatures matters to you, consider using an email client that employs an HTML rendering engine, such as Outlook.com.
How to make a signature on Outlook for desktop (Mac)
Copy and Paste Method
iMac users can add signatures in the Outlook for desktop app via the copy and paste method.
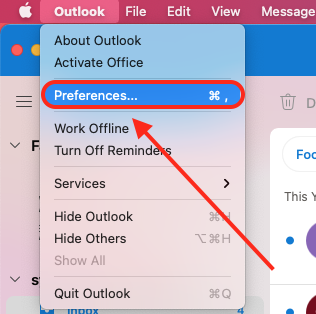
1. Select ‘Outlook’ on the top left corner of your screen, then ‘Preferences.’
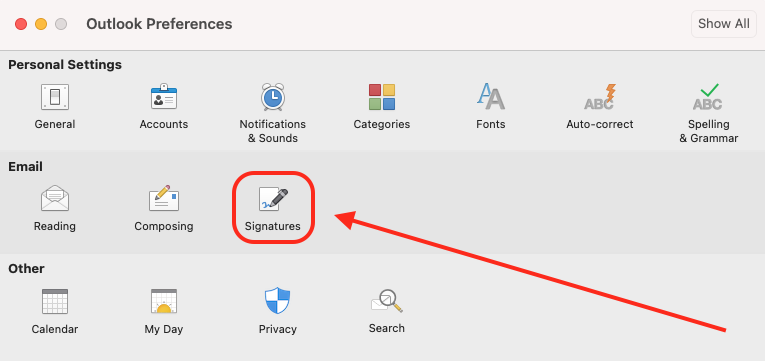
2. Next, Click on ‘Signatures.’
3. Then, Click on ‘+’ to create a new a email signature for mac and then select ‘Edit.’
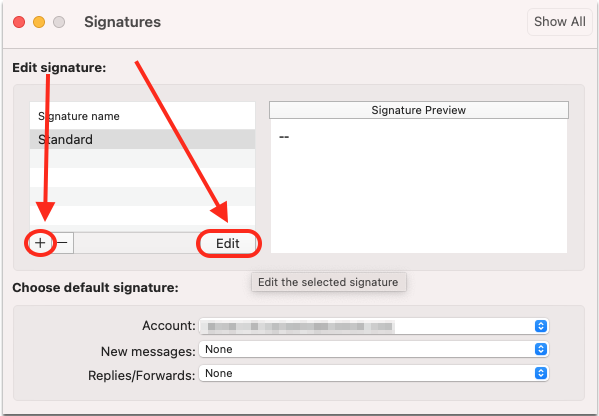
4. Finally, Paste your copied signature and save.
5. Verify your signature before using it in emails sent via apple mac or ios devices.
Default Signature
1. Select ‘Choose default signature’ , this makes sure that your newly added email signature for apple mac will be default email signature in every email you send.
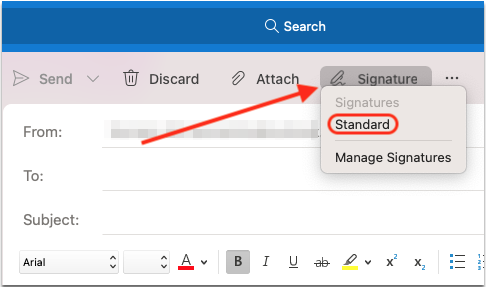
2. If you want to set your email signature on use case basis, click on ‘Signature’ and select the proper one every time you need it.
IMPORTANT: HTML signatures have faced challenges in the past with the Outlook iOS app.
While they were once reliable, our recent evaluation of the app indicates that your signature’s email and phone number links may be removed, causing them to appear blue for some recipients (depending on their email client).
If achieving a “pixel-perfect” email signature is crucial to you, we suggest using an alternative email app on your device, such as the iOS Mail app.
How to add a signature in the Outlook mobile app
To give your messages a professional touch, you can add an email signature in the Outlook mobile app.
Creating a signature in Outlook for Android
The best way to add an email signature in Outlook mobile app on your Android device is with a text signature:
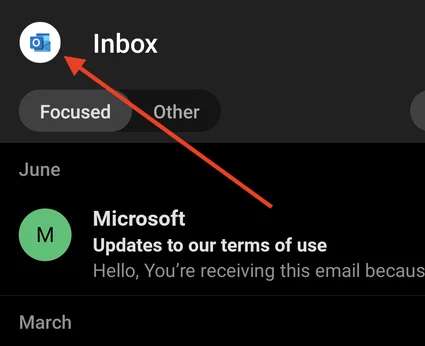
1. Open the Outlook app and click on the Outlook Profile icon.
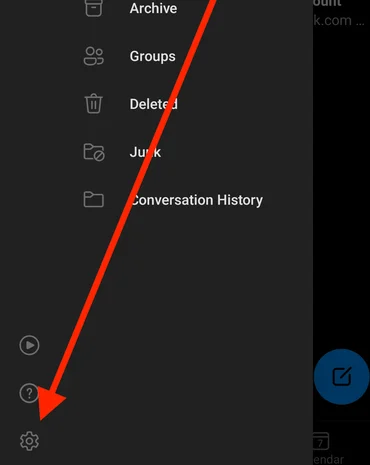
2. Click on the Gear icon at the bottom-left corner of the column.
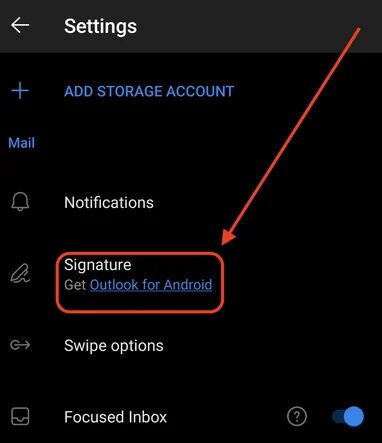
3. Next, click on your account and then tap on Signature.
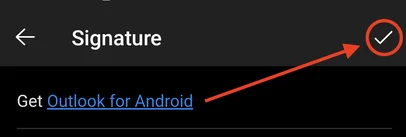
4. Finally, in the opened text editor add text, links or email signature created with syncsignature and then tap on ✓ symbol.
5. Your professional email signature will now appear at the bottom of all outgoing emails from Outlook on your Android device!
Creating a signature in Outlook on iPhone
Basic Process is same as Android Phone. Steps are as follows:
1. Open the Outlook mobile app for iPhone and go to Settings.
2. Tap on your profile icon and then tap Signature.
3. Next, Enter your desired email signature text in the box provided. You can also tap the email Signature Image button to add an image to your signature (this is optional).
4. Once you’re happy with the preview of your professional email signature, tap Save.
That it. Now, all the outgoing mails will carry your professional email signature block everytime.
How to edit a Email signature in Outlook
The Process of changing your email signature is very easy regardless of platform of outlook you use. Here’s how to change your it:
Change email signature in Outlook for Windows
If you’re using Outlook for Windows:
1. First, Open Outlook and click on the File tab.
2. Then, Click Options and then choose Mail.
3. Next, Scroll down to the Signatures section and click the Edit button.
4. Make your changes in the email Signature Editor and then click OK.
5. Done. Your changes will be saved automatically.
Edit Email signature in Outlook for Mac
If you’re using Outlook for Mac:
1. First, Open Outlook and move to the Preferences menu.
2. Then, Click on the Signatures tab and then select the signature you want to edit under ‘signature name’.
3. Next, Click on ‘Edit’ and make your changes
4. Finally, Click on the ‘Save’ icon to save your changes and then close the window.
Changing your email signature in Outlook 365
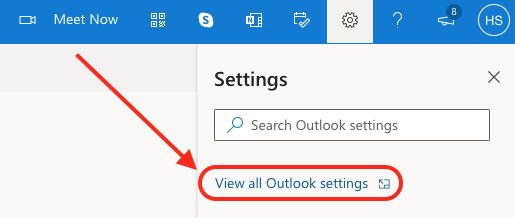
1. Log into your Outlook account and click on the gear icon in the upper right-hand corner.

2. Then, Find “View all Outlook settings” from the drop-down menu and click on it.
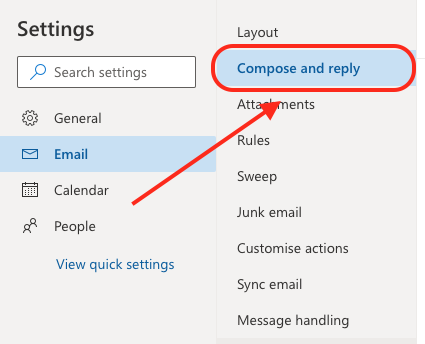
3. In opened window, Click on ‘Email’ in the left-hand sidebar and then ‘Compose and Reply’.
4. Inside Signature, enter the changes to your branded email signature in the text box provided.
5. Finally, Scroll down to the bottom of the page and click ‘Save’ to save your changes.
Updating your email signatures in Outlook is a quick and fairly easy process that takes only a few minutes to complete.
Whether you’re using the desktop version, Outlook.com, or Outlook on the web, you can easily update your professional email signature to reflect any changes.
How to add a signature in Apple Mac Mail
1. Log into the ‘Mail’ app on your Apple Mac device.

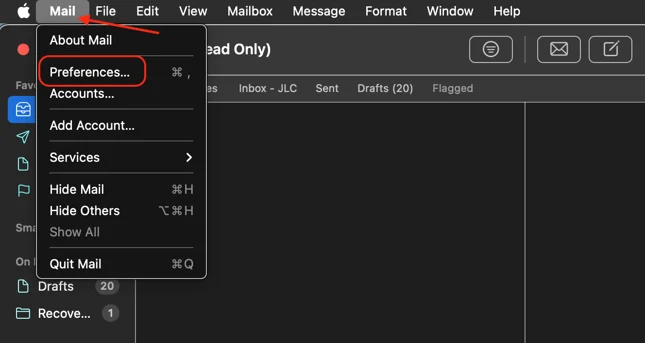
2. Now, Go to ‘Mail’ and then go to “preferences’ to open settings menu.
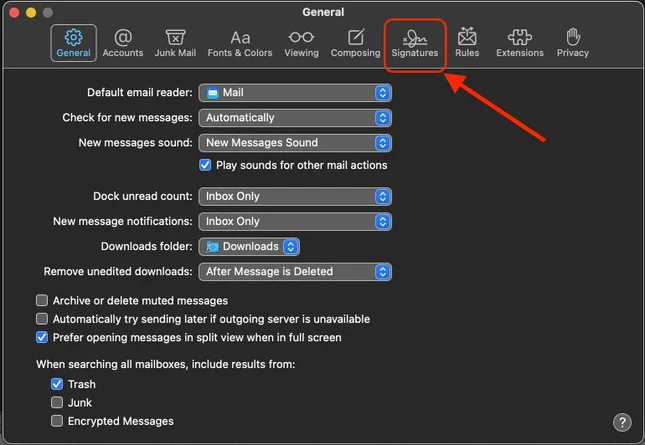
3. Then, Select ‘Signatures’.
4. Next, in opened left panel for account list, select the account you want to create a signature for.
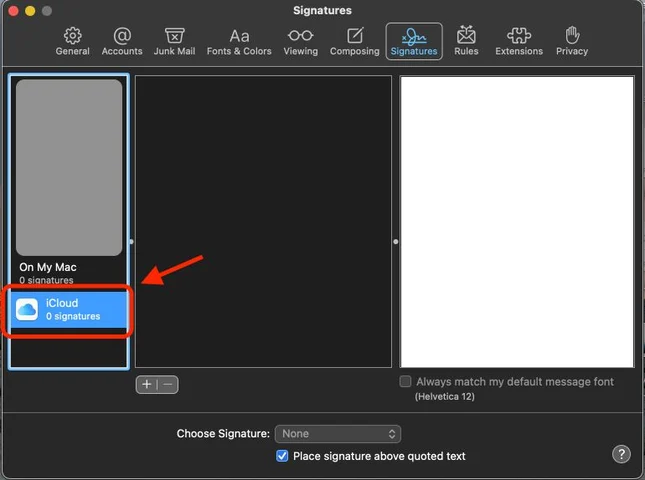
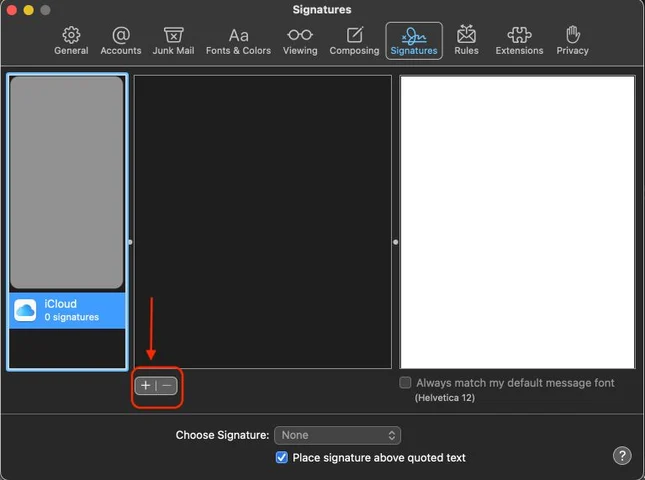
5. Now, Select the “+” button opened in bottom part the middle panel to add a email signature.
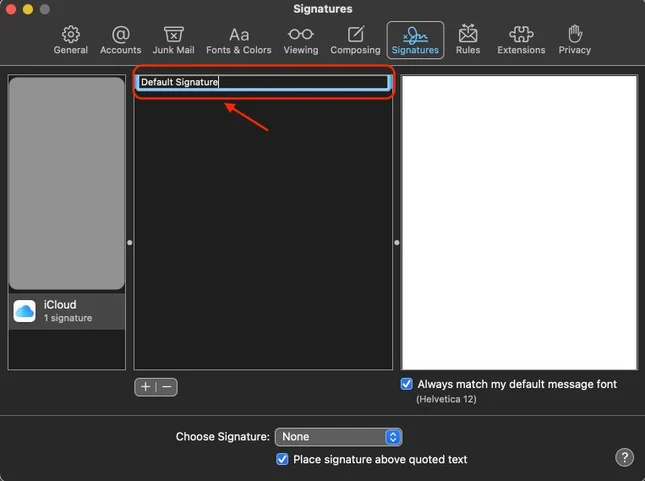
6. In Signature list column (middle column), type a separate label for the mail signature, such as “Default Signature.”
7. Use preview area (right column) to create your desired emails signature. You can add text, alter formatting, and even add an image by drag n drop an image into the preview box.
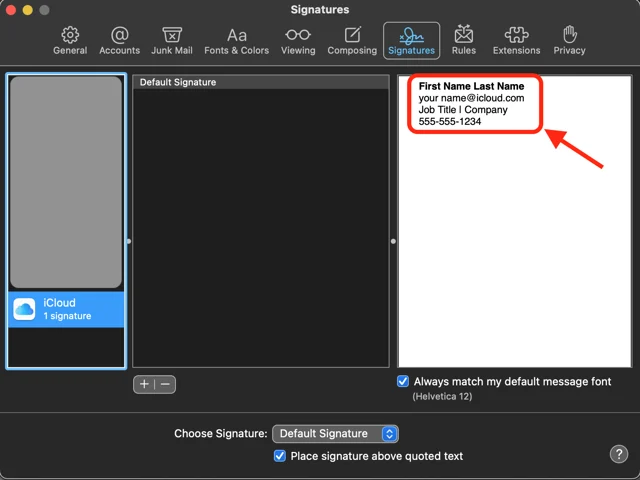
The saved email signature will now be available to choose when you are writing an email in apple device.
Automatically add your email signature to Apple Mail emails
Follow below steps to automatically add your email signatures in mail you send everytime.
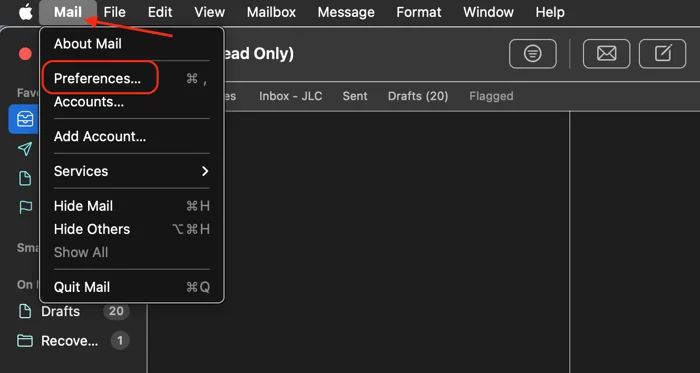
1. Open the Mail app and navigate to ‘Mail’, then “preferences’.
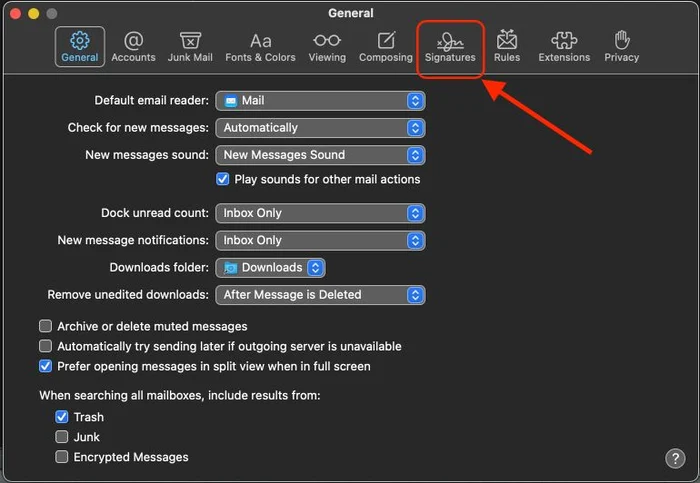
2. Next, click on ‘Signatures’ and select an account in the left column.
3. Finally, from ‘Choose Signature’ dropdown menu in the middle column, select the email signature you want to automatically add to you emails.
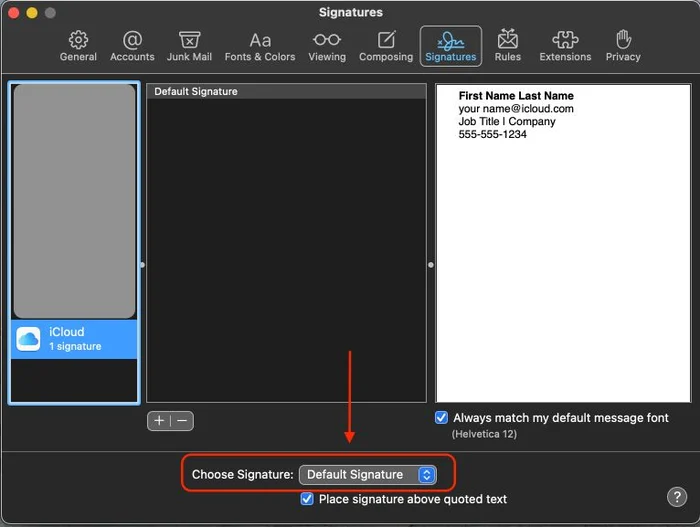
If you want to change or remove signatures that are automatically added to your Apple Mail emails, you can use the ‘Signature’ dropdown menu in a new email and choose ‘None’ or a different signature.
How to add logos to email signatures in apple mail
You can use your Mac computer or laptop to add a logo to your email signature with the Apple Mail image in signature feature. This is one of the best features for Apple users.
To add a logo to your Apple Mail signature:
1. First, Add an image file of your logo to your Mac desktop.
2. Then, Open the Mail app.
3. Now, click on ‘Mail’ and then ‘Preferences’.
4. Then, Select ‘Signatures’.
5. Finally, Drag the image file from your desktop and drop it to the right column where you can edit your signature.
And that’s it! Your logo image will appear in your Apple Mail signature. (You can remove it by highlighting the image and hitting ‘delete’.)
How to add HTML signatures to Apple Mail
Apple Mail restrict you to paste HTML code directly in the ‘Signatures’ pop-up menu. Instead, you’ll need to create a new signature and then find and edit the signature file on your Mac.
To add your custom signature to Apple Mail after creating it:
1. Copy your email signature.
2. Then, open the “Mail” app, then navigate to ‘Mail’ and ‘Preferences’.
3. Select ‘Signatures’.
4. Create and label a new signature, and uncheck the box that says ‘Always match my default message font’.
5. Paste your signature in the right column, and that’s it! Your custom signature will appear when you draft a new email.
You can customize your email signature on Apple Mail in a few minutes. If you need to make changes, it’s simple to go back and edit or create variations.